Preparation hacks – or how not to resent your vegetables


Our ancestors thought nothing of standing at the kitchen sink washing salad leaves, potatoes and carrots of mud, cutting out the brown bits and removing slugs. The modern vegetable grower, however, is less patient. We’ve grown up with supermarket fruit and vegetables, pristine, plastic-wrapped and pre-washed. Bung it in a bowl and open a bottle of Merlot.

And even though you might  feel an inward glow of pride at your authentic mud-caked, wonky home-grown veg as you cart them into the house (quick pause to snap them for Instagram on the way), let’s be honest, getting them to a state your children will actually eat can take a while. As you stand carefully washing every single tiny baby salad leaf time seems to stand still too. Your legs are numb, your back twinges and you look at your muddy, misshapen, often disappointingly small vegetables, and feel resentment build. 

Having pride in your homegrown harvests is a common emotion, but keen growers will know disappointment too. Your new potatoes might look perfect when you dig them up, but wash off the earth and the full glories of scab reveal themselves, rough patches that need peeling off. Wireworms will probably have had a go too, making little black holes that need digging out with the tip of a peeler. Leaf miner caterpillars doubtless made brown tracks in your chard leaves so add a few minutes to cut these out too, and your carrots could well be housing carrot fly maggots (look for little holes and tunnels inside).

So it all just takes a bit more time. And don’t beat yourself up about it. Professional growers don’t have these problems because they’re experts, growing for the very exacting supermarket buyers. You cannot compete with them. When you’re just a casual enthusiast, you won’t grow perfect vegetables. You just won’t and that’s absolutely fine. They will still be delicious, fresh and healthy and all those other good things. You can obsess over how to avoid scab, carrot fly, aphids and everything else but in my experience, if you accept imperfection, life is so much easier and you will love your vegetable patch more.

So,  for what it’s worth here are a few things I’ve learnt about how to speed up prep time for my home-grown fruit and vegetables. They might just save you a few minutes. At the very least your back will thank you. If I’ve missed anything obvious please add it in the comments at the bottom, I would really love to hear your tips!

  1. Buy a salad spinner. Doesn’t have to be expensive, just a plastic one is fine. After washing spin the leaves to remove the water and you won’t have to dab them with a clean tea towel or wrap them in a tea towel and fling them wildly around the garden (though perhaps this was just me) to avoid a soggy salad.
  2. Compost in situ. Why bring rhubarb stems, beetroot, parsnips and carrots into the house only to cart the leaves back out again to the compost bin? Save time by removing the leaves and other inedible bits in the veg patch and putting them straight into the compost. No need to be perfect about it, just tear them off.
  3.  Wash outside. If you have an outdoor tap, give muddy potatoes, carrots and other root veg a quick wash right there so the mud can go straight back into the garden rather than down the plug hole. If you wash them from a hose over the veg patch you’ll be watering the remaining crops at the same time.
  4. Keep your leafy greens and soft fruit separate from your muddy ones. Sounds obvious but I often forget. Put raspberries, salad, spinach, chard and other leaves you will eat in their entirety in a clean container rather than chuck them on top of a load of muddy beetroot – obvious why.
  5. And this is the most important one: adjust your mindset so you expect the extra preparation time. We have got used to thinking of vegetables as a last-minute addition to the meal – a few minutes in the steamer – but these days I get them washed and prepped first to avoid last-minute stresses. Open a bottle of wine, listen to the radio, make it that dreaded word, mindful.     


How to keep paths free of weeds without burning down your house – a personal journey of enlightenment (here’s hoping)

Donkey spurge and stachys edge the beds

Eight years ago, I turned a a farmyard that had been covered in concrete for decades into a garden. I sketched island beds out on a bit of paper and then sprayed the shapes on the ground with line paint. The paths between were covered with golden Breedon gravel. So flat, so pristine, so weed free.

It didn’t take long for the weeds to move in. I don’t mind this sometimes – I can’t blame verbascum, verbena, donkey tail spurge, thyme and oreganos for preferring that nice free-draining limestone atop a type 1 base to the poorly drained sludge of subsoil and compost I plonked them in. But the grass that covers the gravel in a green fuzz with a mossy understorey isn’t quite the look I’m after.

Nice hot tub, shame about the manky, grassy, mossy path

The past eight years has been an unequal, time-consuming battle between myself and the path weeds. Hand-weeding seemed the obvious solution at first. But with ‘self-binding’ gravels like Breedon, all this does is wrench big clods of gravel out of the path with the rootball, leaving holes and dips in the surface and revealing the type 1 beneath. So I resorted to the chemical route with Roundup. Yes I know. Bad. After around three weeks the path weeds turned a sickly yellow. Trouble was – quite apart from all the insects I probably killed in the process of spraying and the general eco awfulness of the whole thing – the yellow plants just stayed there looking horrible.

Next try was propane gas. Yes, bad too since it’s a fossil fuel. First I bought an enormous red metal flame gun on the internet. We lit it and very nearly burnt the garden and house down. Even after we turned the gas off, the flames shot out into the flower beds setting fire to the dry plants and heading frighteningly near our wooden weatherboarded house. It went back in the shed and I will never touch it again.

Verbascum seedlings might be allowed to stay, but the grass and moss has to go

Chastened, I downgraded to a light weed gun, also powered by fossil fuel propane, but this time with a neat, unscary can that you screw on. It’s fun to use as you zap around the garden and quickly nukes dried path weeds like grasses in high summer. But it’s time consuming and unless the plants are are dry, you need a couple of sessions. Also, I’m sure I’ve vaporised a few ground insects on my Ripley-like sessions and those empty propane cannisters will end up in landfill.

Santolina, so pretty, but the grass is never far away

Hot water was the next weapon I mobilised, inspired by Bob Flowerdew. Every time I boiled the kettle I went outside and dribbled the remains onto weeds on the paths. It worked brilliantly on dandelions which quickly went a satisfying khaki colour and then shrivelled up in days. Eco-wise not so bad, especially if you don’t boil the kettle specially (and have a renewable electricity provider). But the grass seemed pretty much immune.

It was only this winter that I realised a possible solution. One that is eco-friendly. One that costs nothing. One that was staring me in the face for the past eight years.

Verbena thinking about setting seed into the path last summer

One day I had the sudden (and, it would be fair to say, belated) realisation that the only parts of the path that weren’t covered in moss, grass and weeds were the parts we walked on the most. What would happen, I thought, if I tried to fool the path into thinking we walked on it everywhere? I started scuffing my boot across the surface of the gravel in an imitation of an army of walking feet and moss and grass scudded away leaving a flat surface. The roots are still there underneath but underneath a clayey cap and, I figure, if I keep repeating the scuffing, they will eventually give up. Won’t they?

After the flame gun

So far I’ve spent a few happy half hours kicking around the paths – it’s an excellent displacement activity when I have a deadline looming. Plus what else are you going to do in the garden in January? It takes no longer than blasting with flames. It won’t kill insects. It’s kinder than Roundup. It’s much faster than walking around with a dribbling kettle. At the very least, I’ll end up with very strong thigh muscles.

Don’t throw it, sow it!

Brave new alphabetical world!

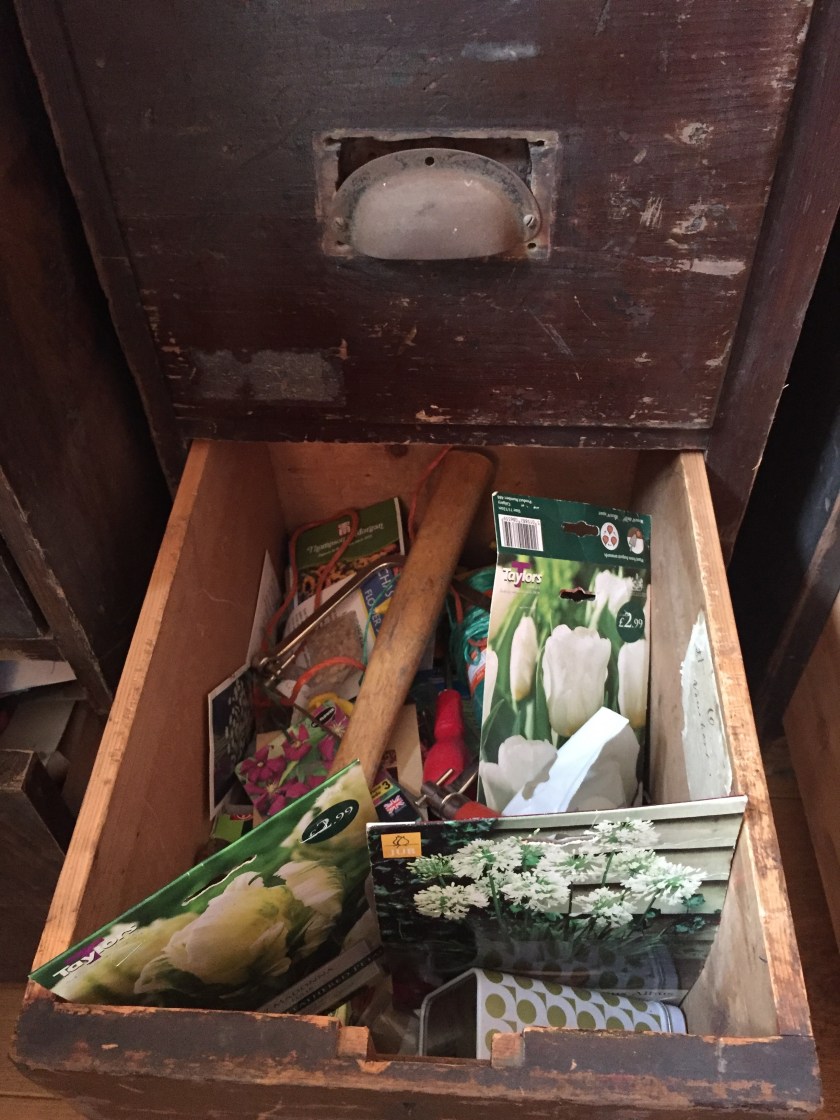
There’s a drawer in my house that makes me feel guilty. In this dusty, wooden recess lies a testament to human fallibility. Crumpled paper and plastic packets announce themselves in faded, soil-splattered letters, as Nero di Toscana and French Touchon, Golden Bantam Dolce and Tricolour. Their edges are torn, their contents are leaking, they speak of broken promises and neglect. They share their space for some reason with a hacksaw, labyrinthine tangles of string and some old bulbs that have started to smell weird, all of which may go some way to excusing my reluctance to go there, but there is really no excuse. Over the course of the past 5-10 years I have bought these seeds and now I’ve abandoned them.


The guilty drawer

We all have a guilty drawer. Maybe yours is full of foreign coins, 3D cinema specs (yes, we’ll buy another set of four, please) and old mobile phones. But if you have ever gardened, chances are you have a drawer just like mine. And, as every year goes by, the seeds you bought with such hopes of burgeoning magnificence and harvest glories get older and mustier. You give them a wide berth.

Packets of seeds are not expensive, but when you have a drawer of 100 of them, it mounts up. There’s usually an expiry date on the bottom of the packet, two to three years into the future. But when this time is up, should they be thrown away? And what if the packet’s half used up? Do the remaining seeds last as long, their air-vacuumed state compromised? If it was a damp day when you sowed, would that affect the longevity of the rest of the packet? And how long do seeds last if you’ve saved them yourself in old envelopes? For the beginner vegetable grower it can be tempting to throw them away and start from scratch each year. Or, if you’re like me, you just leave them in a dusty, weird-smelling drawer for 10 years and pretend they don’t exist.


My oldest or most knackered looking seed packets

But no longer! This is the year of the seed drawer and I resolved to do something about it. First I put all my old vegetable seed packets in alphabetical order in an old wooden box. I’ve always been childishly opposed to alphabetising, on the grounds that the next step is socks under my sandals and the outlines of tools drawn on shed walls so they hang up neatly (actually, an extremely sensible idea), but as I get older, I find myself embracing these sort of nerdy practices. Because, you know what, complacent former me in my mid 20s, it saves time in the long run! And you won’t cut your hand on a hacksaw when you’re looking for climbing squash.

Next I chose some of the oldest, craggiest, sorriest-looking seed packets I could find and sprinkled a pinch of their seeds on moist kitchen paper on a plate. I can remember buying some of these carrot, kale and chilli seeds when my kids were teething. They’re now playing rugby and showing me how to use social media. Making sure to label the seeds, I then put clingfilm over the whole lot and put the plate on a windowsill inside.


Just scatter seeds onto damp kitchen paper, don’t forget to label

There is no need to water – the clingfilm keeps them moist. After two weeks, everything that is going to germinate will have done. Over the next few days, my seeds gradually plumped up until, bingo, some actually put out a tentative white root. Six days in, and most of the carrots have already germinated and two kale seeds are leading the way. The chillis have eight more days to prove themselves. There’s life in (some of) the old seeds yet! But how much? And how does this help? Well, if, after two weeks, half the seeds germinate, I know I have to sow double the quantity to get the same rate of germination. If only one in 5 actually germinate, then I sow five times as much. If none germinate, I chuck them away with a clear conscience.


Carrot seeds and one round kale seed germinating. Sorry about bad picture quality – someone buy me a macro lens

This makes me happy. At this time of year, as we all gaze into our guilty drawers, I’m offering you a way out. Get that saucer and test your seeds before you throw them away and throw money down the drain on new ones. Maybe next week I’ll show you what to do with all your 3D specs…